Friday, June 29, 2012

too long

you know you've been renovating too long when:
  • your baby uses floor samples as building blocks
  • your baby prefers to push around paint rollers instead of toy cars
  • you perceive all the white dust as a great way to practice letter formation with your preschooler
  • your kids express home improvement store preferences
  • instead of grabbing a piece of paper for a phone message, you just write directly on the wall

what are your "renovating too long moments?"

Thursday, June 21, 2012

inspiration (black & white)

I've really been thinking about color palettes lately, now that I have a completely empty and
furniture-less room.
We have so much color outside right now, that I find myself drawn toward the black and white color combination. Handyman has traditional and conservative taste, so I often have to convince him through images that black and white doesn't necessarily have to be super modern, cold, or impersonal.
In fact, the black and white palette could work in any room of the home, from the front entry all the way through to the bedroom. Check out these images, and notice how the design is kept warming, inviting, and often traditional and timeless.

Each image has a few design elements in common:
  • a warm or neutral floor
  • an interchangeable pop of color (with flowers, pillows, or accessories)
THE FRONT ENTRY

This black and white entry is has the warm tones from the hardwood, and even a very neutral and beige area rug. The touches of pink could easily be swapped with almost any color such as kelly green or navy blue. I love how you can catch a glimpse of the glossy black door in the mirror's reflection.

The KITCHEN
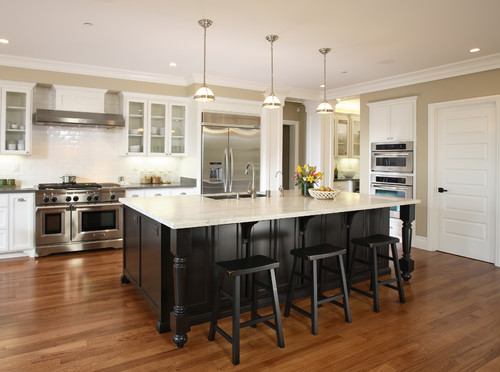
This kitchen is really a blank slate. It's well-designed with classic materials and finishes. The owner could easily influence the overall style of the space with their own accessories and personal taste.


THE LIVING AREA

  This is not an overly black and white living space. The black fireplace in contrast with the crisp white surround and mantle are the contributing black and white element of the room. The gray walls have a warm hue and the deep colored wood coffee table, along with the gold frames balance the stark contrast of the hearth area.
THE BEDROOM
source

 This bedroom is a wonderful example of modernizing a more traditional look. The stuffiness of the four poster bed is toned down with glossy black paint and the striped graphic pillow and vase balance the antique oil painting.
THE GALLERY WALL
source -unknown

 For those afraid to commit to any entirely white or black gallery space, this is a good example of both.

THE LAUNDRY ROOM
source
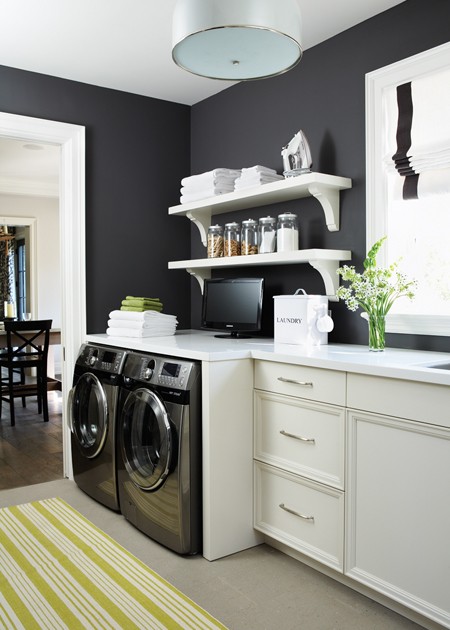
 For those willing to commit to a dark wall color, this bright laundry room demonstrates a even balance of black and white. The white shelves lighten the walls, while the corbels add some charm. The window valance is simple and the adjacent room is a contrasting lighter color. And of course the striped green rug could be interchanged with any desired hue.


If you want to try something different, you could add a graphic black and white pillow to a neutral space, likes these cute damask pillows below.
What's your favorite color palette?

Tuesday, June 19, 2012

a look back -part two

A Look Back At Our DIY Family Room . . .

After we demolished the family room, which was the fastest part, it was time to start rebuilding. Since this was a more an impromptu project, Handyman ran out and bought a bunch of dry wall, screws, and mud.

 This is how it looked after all the dry wall was up, mudded, sanded, painted.

This was the beginning of our tongue and groove bead board ceiling. I had read in several resources to paint the boards first, so we did. However, we noticed it didn't seem to matter since we had to go back to mud and sand each individual nail hole.

This is how it looked after the entire ceiling was up, before the crown.

This is how it looked after we installed the recessed lighting. This room did not have any overhead lighting.

I love how the bead board ceiling turned out, it beats the acoustic ceiling tiles we had before and is a better fit for this cozy cottage-like cape. I did get a few quizzical looks from friends when asked about our ceiling plans and my response was bead board.

Anyone else ever install bead board on the ceiling?

Sunday: I Heart Naptime, Nifty Thrifty Things, It's Overflowing Monday: Delectable Home, C.R.A.F.T. DIY Showoff, Between Naps on the Porch, Thrifty Decor Chick, Debbie Doo's, Home Stories A to Z, Evolution of Style Tuesday: Coastal Charm, Nest for Less, Tip Junkie, My Uncommon Slice of Suburbia, A Bowl Full of Lemons, Get Your Craft On, Kurtz Corner, Centsational Girl , Primitive and Proper Wednesday: Savvy Southern Style, Organize and Decorate, Mommy Solutions, Power of Paint, Newlyweds Recipe Linky, Southern Lovely , Home Happy Home, Crafty Sasse Wednesday, Gingersnap Crafts, A Crafty Soiree Thursday: The Shabby Creek Cottage, Made in a Day, House of Hepworths, the 36th Avenue, Crafty, Scrappy, Happy, 52 Mantels Friday: Making Lemonade, Blissful and Domestic, One Artsy Mama, Serenity Now, Tatertots and Jello, The Shabby Nest, Thirty Handmade Days, Addicted 2 Decorating, Funky Junk Interiors, Financial Friday, Furniture Friday, At the Picket Fence, The Rooster and the Hen, Classy Clutter

Monday, June 18, 2012

fishy party

We celebrated our baby's first birthday earlier this year. Since he was too young to care {or notice} the theme, I let the other kids decided for him. And they came up with a fishy theme party.

Due to some unexpected plumbing problems at our house on the scheduled weekend, we quickly relocated the party to a family friend's home.

These are all easy details that can be done anywhere and are easy to pack up at a minute's notice (like we did!).


1) DECORATIONS
Clear helium balloons from the party store and orange and turquoise streamers solidified the fishy theme.

2) FAVORS
I made these simple take home favors from turquoise colored bubbles that I found in the wedding section at Michael's. I adorned each with a fishy tag. I punched white circle rounds with my favorite circle punch, wrote "Thanks for swimming by" in a circle along the parameter, and let my 6 year old draw a single fishy in the center. If you have to make a lot, I recommend using a computer, and printing out. But, this was some fun mommy/daughter time together.

3) CAKE
Any cake will do. Choose your child's favorite. We have a family tradition of chocolate cake, because the chocolate crumbs show up best in the photographs!

4) FOOD
Fish shaped sandwiches- I purchased Pepperidge Farm's goldfish sandwich bread from the grocery store. Ours were PB&J, but if you have a nut allergy, choose your own favorite filling.

I kept it simple since it was a one-year's birthday party. But there lots more fishy ideas out there. What would you have added?


Thursday, June 14, 2012

blog design sale

If you haven't been over to the Mustard Ceiling, you are missing out. Elizabeth, not only blogs about great interior design, but she also runs her own web design business, TMC Design.

Today is the last day of her summer sale and a chance to get 20% off her design packages. She just released these fun ikat pre-designed templates. I think they are pretty darling!

Check them out. . .


I'm off to to enjoy my last few days of kids-in-school freedom. What are you up to today?

Wednesday, June 13, 2012

father's day prep

It's time to start thinking about your favorite father, if you haven't already.

Handyman is pretty boring predictable with his father's day gift requests. He's perfectly happy with a new button down shirt and a new tie.

He started wearing these Smartcare shirts from Nordstrom years ago, and has never bought another brand since. He just loves them! The Smartcare make them virtually wrinkle resistant, and I love that I can easily pick them at the store or purchase them online.

Considering he wears one 6 days a week, I think that's a pretty good track record.

image source


But if your guy isn't the button down type, or your feeling crafty, there's lots more ideas out there Here are just a few. . .

If you have little ones, this print from Modern Keepsakes is perfect for preserving little hand or dare I say paw prints?

image source


I think this vintage soda bottle printable from Delightfully Noted is pretty cute. . .

image source


I'd really like to do this. I wonder if I could get my kids to sit still long enough . . .

image source

Then, I could load it on the digital photo frame I gave Handyman for Christmas a few years ago.
{It's only the smallest pair of wiggly feet that I don't think will cooperate.}

Wish me luck!

How are you prepping for Father's Day?

Tuesday, June 12, 2012

a look back -part one

Since we started our family room renovation before I started blogging, I realized that I never revealed all our slow-learn-as-we-go-along-the-way progress.
We started here. . .this is the listing photo.


The first mini project was taking out the coat closet, and gaining access to our garage. Handyman just installed a door and hung the same existing brown clam shell trim.

At some point over the summer we painted the room. But by the end of the summer, Handyman was tired of my constant complaining encouragement and relented, and demo began.
The first step was to remove this space hogging gas stove.

  
With the stove gone, the room felt instantly larger.

Next, it was time for the brick hearth and wall to go.
The brick was laid on top of the wood paneling.
Everyone wanted to get in on the demolition action.
Within minutes the brick was down.
And we were left with a mess. Due to their weight and size, I knew the best way to offset our disposal costs would be to give away the bricks. I immediately hopped on the computer and posted an ad on Craig's List. By that evening, a thrifty-patio-laying couple contacted me, and hauled away all the whole bricks, leaving only a handful of partials.
Next, we started removing the wood paneling.

With the wood paneling removed, we could see the condition of the insulation. It was old and needed replacing, and explained why the room was constantly cold in the winter. It wasn't a lack of heat as we first suspected, but precious heat was escaping. (This room has two heating vents, which we later worked around when installing the baseboard trim.) The room was losing heat. This reassured us that even without the gas stove, we would be warm enough in the colder months. After living in it a complete winter, we happily discovered we were perfectly cozy, warm, and best of all draft-free.

My only regret of ditching the gas stove is losing a non-electric heat source when we get these gnarly Nor-Easter storms here -which seem to occur a few times a year.

Handyman took out all the old fiberglass insulation and replaced it with new insulation. He filled in all the gaps around the window and the front door. (He had already sealed all the gaps to the garage door when we took out the closet. He used the expanding yellow spray foam.)

Although we didn't plan on replacing the insulation, it came with a couple of unexpected benefits. The first was the smell. My house no longer had someone else's smell. The old insulation had accumulated a few decades worth of various odors.

Another benefit of removing insulation, was the opportunity to rewire the electrical in the room. We had light switches everywhere. In this room we had
  • the outdoor porches lights
  • the pool lights
  • the backyard outlets
  • the patio lights
 I imagine this was a result of the various additions to the home, but we figured since we had the walls open to the studs, it was a great opportunity to improve it.

However, Handyman did not like crawling around the in the leftover rodent droppings. And I was happy he assured me they were old droppings and not fresh. Phew. (We don't need any extra occupants hanging out in our attic.)

We didn't want to live with it like this, so re-building was imminent.

Next, I'll show you how we went about rebuilding the room.

Monday, June 11, 2012

popping corn

I'm so happy that summer is finally here and that I'm no longer just dreaming of it. One of our favorite things to do as a family is hang out in our backyard. Handyman builds a fire and we all pull up a chair and enjoy the flickering flames.

This season our favorite outdoor treat is popcorn.

Popping corn is easy and you only a few things before you are munching away on a hot and yummy handful.

You will need:
  • a hot {but not roaring} fire
  • popcorn kernels
  • cooking oil
  • skillet with a cover (we use our indestructible, seasoned cast iron skillet)
  • gloves
Directions
1) Place about 1/4 cup kernels and a 1 tablespoon of oil in your skillet (these portions are adjustable)
2) Place your skillet directly on your fire.
3) Once your hear the first pop, feel free to give your skillet some shakes as the the kernels pop away.
4) Season to taste -we like freshly ground sea salt

The skillet gets very hot, so don't forget your gloves. We often just grab our work gloves because they are nearby, but certainly an oven glove works just as well.

By spending time with my family, I hope to create some great family memories for my children, like the ones my mom records in this journal I made her a while back. I get to read a little bit more each time we go to visit. It's so fun learning about her favorite childhood memories.


Have you ever made popcorn over a fire? What's your favorite backyard activity? Or how do you perserve those sweet family history stories?


Thursday, June 7, 2012

hardwood how-to

The last time I showed you my family room it looked like this, posted here.
And last time, I {sorta} showed you the hardwood that I purchased from Home Depot, posted here.


Handyman got home from work Friday evening, changed his clothes, and started right in on taking the tile out of the room. (This is why I have very little in-progress photographs. He gets right to work, and if I'm not around to snap a few pictures, they didn't exist.)

Using a crowbar and hammer, Handyman removed all of the tile by the front door. He had the children carry it to the Bagster, posted here, in the driveway.

He removed the top layer of the vinyl flooring, leaving the under laying paper layer.

Then, he ground off the residual tile mastic leaving the underlying plywood sub floor smooth. We wanted a nice even, level surface to lay the hardwood.


After laying the black tar paper with a staple gun, it was time to start laying the hardwood. We rented this tool, a hardwood gun stapler and double sided mallet hammer from Home Depot for $75. It just plugs into an air compressor and makes the work a lot easier than doing it by hand.

Handyman and his dad followed the manufacturer's installation instructions.The hardwood we purchased is factory finished and has a tongue and groove. The pieces easily interlocked into each other for a tight fit.


After the floor was in, it was time to install the baseboard. We wanted the baseboard to be flush with the our new door trim. The baseboard we purchased wasn't as wide, so we add width with a simple furring strip. These are easily cut on a table saw.


The baseboard also had to accommodate a few other cuts, such as our shoe cabinet, since we chopped the legs off it no longer accommodate the taller baseboard trim. (The legs come long enough to not to do this, but we wanted our shorter.) If we remove the cabinet, we can easily pop in a new, non-cut piece of baseboard trim.

This is the closest wall color -gray with a little bit of a blue undertone.

We also had to accommodate our two heating vents. We did this by lowering the vent so the vent cover occupied the widest part of the trim. We have access to these vents in the basement, so lowering them a smidgen was easy.


The final floor task was finishing the space between the floor and the doors. This was just standard weather stripping.


The finished product
We still have all the touch up work left, but almost all done . . .

Now my family room floors match the rest of the hardwood floors throughout the rest of the house.

 Even though the room is empty, I think it's better than when we started.


You can read more about our family progress:

TDC Before and After

Tuesday, June 5, 2012

i forgot to mention

My little boy was helping me in the yard the other day. He recently sprouted a seedling at preschool and was eager to it plant it in our yard.

When I looked over to check on his progress, I noticed the plastic bag full of water in a pot in the ground. I forgot to explain a few simple gardening tips to him. This is what i forgot to tell him.

DON'T OVER WATER
Plants can be over watered -and eventually drown. Check the water requirement on the packaging. most plants require extra waterings directly after being planted.

DON'T PLANT IN THE POT IN THE GROUND*
The pot restricts the roots and the plant will eventually become root bound (when the roots grow circularly around the inside of the pot for lack of a place to go), and stop growing.
*There are exceptions to this rule. For example, some plants (like mint) are very intrusive and will overtake the entire space. Plant these in pots in the ground if you want to control their growth.

DON'T PLANT IN THE PURCHASED PACKAGING
Unless the packaging was designed to be planted, don't use it. Most packaging will indicate if it is biodegradable and will break down in the soil. The plant needs proper drainage, using a pot with holes provides this drainage. Depending on the needs of the plant, you can also fill with small rocks and or a light weight draining material like vermiculite. Always check with your local nursery if you have questions.


The local nursery is my favorite place for gardening information. They are well informed on native species, their needs, and your climate region.

Monday, June 4, 2012

shrimp boil and banana splits

Handyman's parents are visiting this week. We always love when they come for a visit. Our time always seems to include a house project, taking in a current movie (this weekend it was Snow White and the Huntsman), lots of down-time and conversation, and of course, good food.

My mother-in-law loves to cook and collects much of her inspiration from watching the Food Network and the Cooking Channel. Except, this lady watches the show, then goes to the grocery store and purchases all the necessary ingredients, and whips up some tasty meals.

This weekend, my mother-in-law treated with a classic New England dish, shrimp boil with clams and lemon. She served it with a buttered bread on the side.

Shrimp Boil with Clams and Lemon


Shrimp Boil with Clams and Lemon

Dinner was topped off with one of my Mother-in-law's favorite chef's dishes -Paula Deen. We're such big fans, we may or may not have flown to Savannah for a weekend last fall just to eat at Paula Deen's restaurant, and eat a slice of her pecan pie, which we may or may not still talk about.


Frozen Banana Split
This is a serious summer dessert. Using classic sundae toppings and ice cream sandwiches, it delivers a banana split ice cream sundae all in one bite. It's easy to make too. Just allow enough chilling time.

What did you do this weekend?

Friday, June 1, 2012

top five {may}

Just in case you missed one, here are my top five posts from May:

1) front steps
where I shared why we rebuilt our home's front entry steps

2) favorite souvenirs
where I shared my favorite souvenirs from our recent Costa Rica trip

3) boston cream cupcakes
where I shared how to make these classic pastry cream filled cupcakes from scratch

4) if you give a mouse a cookie
where I shared why how we went from just painting a room to a complete-down-to-the studs makeover

5) practical home accessories
where I shared some of my favorite home accessories and where to purchase them

A special thank you to my readers! Thank you for stopping and reading my blog. I appreciate all your comments and for joining me on this journey as we take baby steps towards updating, renovating, and decorating our little yellow cape.
09 10